A Comprehensive Printable Invitation Guide
Printable invitation templates are a great way to save money while still being able to personalize your birthday, baby, bridal shower or wedding invitations. There are many template designs to choose from and can easily be editable and customized with just a few tips and embellishments. This guide will help you create a professional looking invitation that’s right for your special occasion.
The links in this article open in a new tab so you can check them out without losing your place, so feel free to explore. This post may contain affiliate links. If you buy something through one of those links, you won’t pay a penny extra but we may get a small commission, which helps keep the lights on. Thanks!
Our printable invitation templates are .pdf files that can be edited using the free Adobe Reader software.
How to Download your Invitation Template files:
Once you’ve purchased your template you will be able to click a link to download your files. You will also receive an email with the download link and you can login to your account to access your files there. Keep in mind that there may be more than one file to download and if you purchased an invitation suite your files may come in a zipped folder.
How to Unzip your files:
Most computers come standard with unzip software that opens the file automatically by either double clicking or right clicking the file. If you don’t already have an unzip program you can find many good free ones by searching for “free unzip programs” on the internet. WinRAR and 7-Zip are two that I have used before it was included with my Microsoft Office software.
Editing your Printable Invitation Template:
To edit your invitation you will need to use the latest free Adobe Acrobat Reader software which you can download here.
If you have any trouble with your files it’s usually due to one of the following reasons. Make sure you’re set up for success by following these simple guidelines.
Use the latest version of the Acrobat software
Open up the Acrobat software, then open you .pdf file (some computers have a different .pdf software program that opens as a default).
Make sure you are using a laptop or desktop computer. It doesn’t work on any tablets or cell phones.
How to Make Basic Changes to Your Invitation:
Once your invitation is open in Acrobat you will see the sample text which is shaded in blue. Don’t worry the blue is only an indicator of where you can edit the text and doesn’t actually print. Simply select the text that you want to change and type over it to replace it.
If your file is two-up you only need to make changes to one of the invitations. The other card will auto update just as soon as you remove your curser from that blue text area.
Advanced Editing

You can change the type font, size, color & alignment and line space on your card design with the editing tool. You can access the editing tool by simply typing CMD e on a Mac or CTRL e on a PC. This will pop up the form field text properties editing toolbar which works like most word document software.
Troubleshooting
If you see a plus sign + in the corner of your invitation, that means you have too much text for that area. You will need to fix this even if all of your type is showing because the + sign will print. There are three ways to fix this problem.
Or you can use a combination of the above steps to resolve the issue.
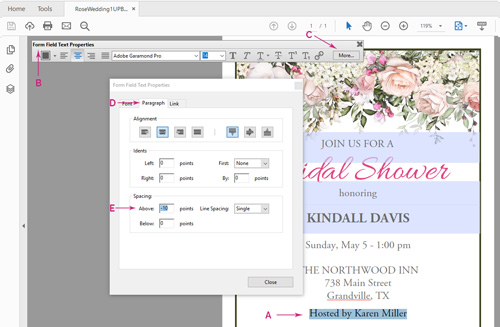
You can tighten up the line spacing by following the five steps below.
How to Change the Fonts:
Changing the font is easy. Simply select the type that you want to change using the drop down selection box on the form field text properties toolbar. This will let you select any font that you currently have on your computer.
If you want a unique font for your invitation you can purchase them online. There are also many great fonts that you can download and use free for personal use. Two of my favorite resources for finding fonts are Google Fonts and Creative Market.
After you download a font you will need to install it in your font folder. Often you can simply right click on the font file and select install.
Keep in mind that if you purchased a font set, you may need to unzip the folder and then install the individual fonts.
Using Custom Font Colors:
You can change the font colors of any text in the blue shaded text areas by highlighting the text and using the form field text properties toolbar. Select the color selection drop down box, then choose “other color” to bring up the full color menu.
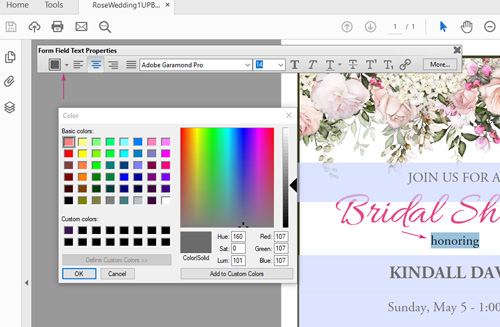
If you have set colors in mind, such as a wedding color palette, you can type in the Red – Green – Blue color values to get your specific color.
Printing Tips and Techniques:
Printing – At Store
The templates can be printed at your local copy store for professional printing/copy service such as FedEx, Staples or Office Depot. With most stores you can either email your file to them or take it a thumb drive.
Printing - At Home
In most cases the files are set up to be printed on a standard size 8.5” x 11” sheet and then trimmed down to size. This makes it easy for the invitations to be printed at home and provides enough room to have two-to-a page whenever possible.
In some cases there may be an optional 1-up template that can be printed on the final card size, eliminating the need for trimming. These files will have at least a ¼” white border around the invitation to allow for proper printing.
Printing Tips:
Advanced Printing Tips
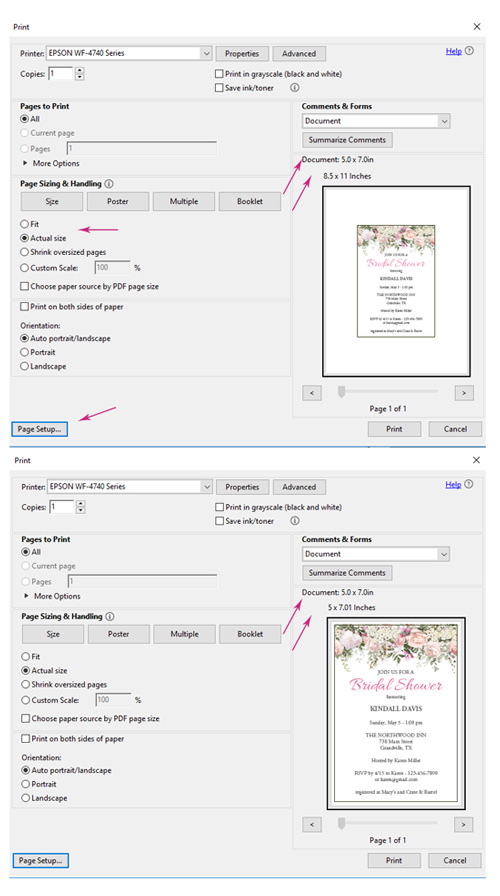
Use the “Properties” button to access your printer’s advanced features. With most printers you can change the paper type and quality of the print which will provide a better outcome.
Recommended Printers:
The price of home printers has dropped dramatically in the past few years, making a good quality printer affordable. If you are in need of a new printer I recommend purchasing an Epson printer. I find the color quality seems to be very good even on their lower end models. I have both the Epson Workforce Pro and the Epson Artisan 1430 Wireless Inkjet printers. The print quality is excellent on both plus they can print on heavy card stock; making them good printers for invitations and cards. I prefer the Artisan for its extra capabilities and speed, but the Workforce Pro works well too and is more economical.
Selecting Paper Stock:
The paper stock that you choose can have a big impact on how your invitations look and feel (and cost). If you’re on a budget and you have any inserts in your invitations you might want to consider using a white or cream card stock. Linen or parchment work well and you can easily find matching envelopes for them.
Cutting Out The Templates:
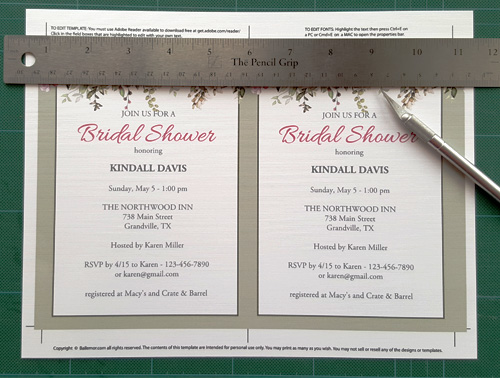
After you print your invites you will need to trim them to size. This can be done by using a craft knife and straight edge on a self-healing mat. Simply line up the straight edge using the provided crop marks and cut out.
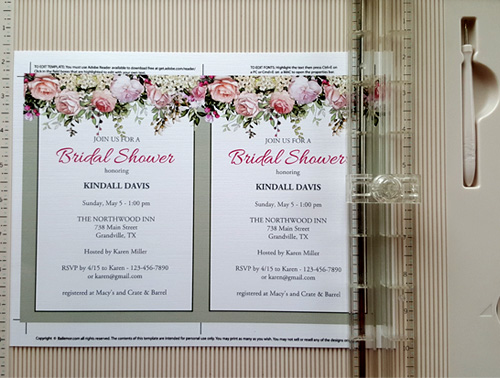
You can also use a paper trimmer to cut your invitations. I have a Martha Stuart paper trimmer with a scoring option which makes folding the thank you cards neat and easy.
Trimming Tips:
Envelope Liner Tips:
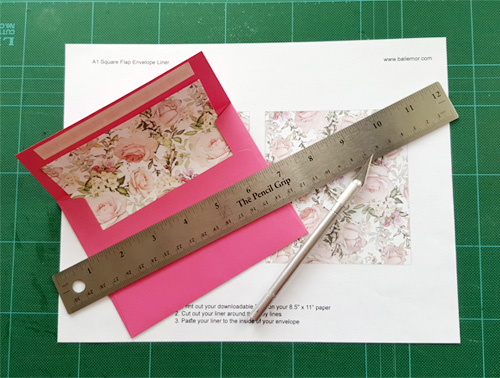
Are you looking for a way to up-level your invitations while staying on a budget? Why not try adding a liner to your envelopes? Our invitation kits come with matching printable envelope liners that you simply print and cut out.
To assemble first position the liner inside of the envelop, then fold closed to create a crease. Next, you only need to use a glue stick or a small piece of two sided tape on the top flap of the envelope to hold it in place. While this does take a little extra time it can really add that special touch that people will notice.
